


GEYSERS:
What is required for a safe and effective geyser installation?
I am not about to tell you how to install a geyser. Again - that's what helps to pay my bond! The intention of this page is to inform you, in the interests of SAFETY what you should and should not see if you happen to stick your head into the ceiling space to check out your geyser. If your installation is significantly different from what is described here, I suggest that you get a plumber to look at it.
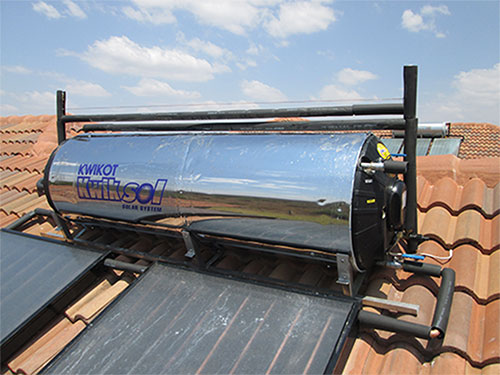
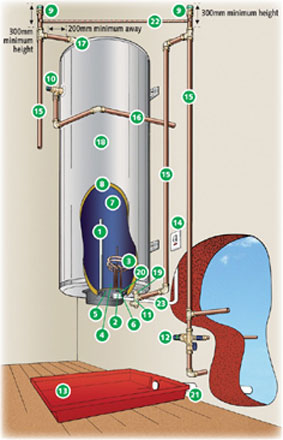
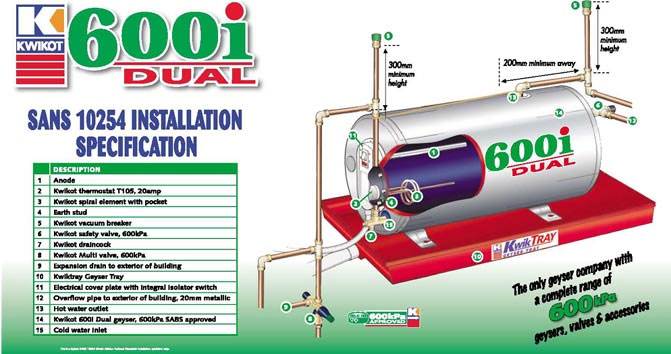
I will describe the typical basic requirements of a sound, modern high pressure, horizontal installation. The following description relates to a modern high pressure (400/600Kpa) system typically made by Kwikot South Africa and others. Horizontally mounted 150 or 200 litre units are by far the most common in modern domestic installations. Less common are old low pressure systems (100kpa) open pipe or "Latco" type systems. Be aware that the parts are NOT interchangeable between the two distinct systems - High pressure and Low pressure! It is possible to remove an old low pressure system and replace it with a modern high pressure system however - you buy a new high pressure geyser and install it according to the current specification. Vertical geysers are also common. The same rules apply but there are some special considerations detailed at the end - with a diagram.
Here is what you should see (in no particular order):
- Drip Tray. The most obvious thing that you should notice right away. The geyser sits in a tray made of plastic (often red) or tin plate. I prefer the plastic ones. They don't leak. Since June 2001, the drip tray is not optional - its got to be there and there has to be a drain pipe for it! The drain is a 50mm PVC waste pipe that drains the tray by piping the water out the house. I have seen many drip trays installed without drains! If your installation pre-dates June 2001 you may want to get a plumber to look at it. There is a fair chance that there is no drip tray.
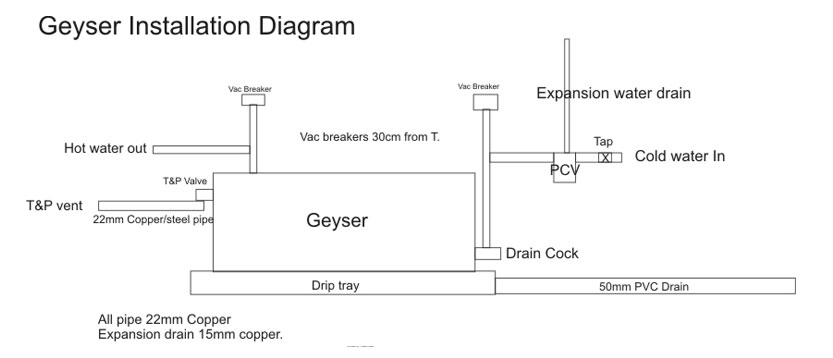
- The next most noticeable feature would be the vacuume breakers. These are small brass components mounted at the end of a 30cm length of pipe. They two vacuume breakers stand vertically about 30cm above the geyser. These are important. They stop the water siphoning out the geyser when the cold supply is stopped. The other other function is to prevent a vacume forming in the tank and collapsing it. It can be argued that this is the primary function but I dont see it as such. Remember that vacuume breakers are a reasonably new requirement - there are still thousands of old HP systems out there without vacume breakers and I am yet to see one collapse. Just because I havent seen it does'nt mean it's not happening however! It is also more likely to happen in a multi story building because the siphon can draw a more powerfull vacuume. New systems MUST have breakers!
- A shut off valve (tap) on the cold water side. The cold water side is the side that directly connects to the drain cock and enters the geyser at the bottom. After the shut off valve you would normally find a Pressure Control Valve (PCV). There are a number of different types. Mostly made of brass but some are made of plastic. You should notice a overflow pipe connected to the PCV that leads to the outside of the building. This is where the PCV releases pressure and this is the pipe that often drips. Don't panic if you cannot find the PCV next to the geyser - it may be mounted up to 10m away, often in a more accessible place on a wall outside. Sometimes it's in a little plastic box outside.
- A safety valve, known as the Temperature and pressure safety valve (T&P Valve) mounted on the geyser towards the top, often on the opposite side to the drain cock. This is a VITAL component that should NEVER be messed with or "repaired". This valve should have a metal (copper or steel) pipe connected to it and the pipe must lead directly out the building. This vent pipe is an important safety feature of the whole system. It must be made of copper or steel - NOT plastic. The pressure rating on this valve must match the pressure rating on the geyser. The T&P valve is the least optional component - it has to be there!
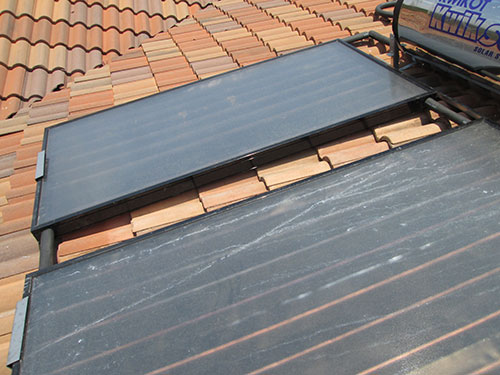
- Support. The weight of the geyser must be adequately supported on the roof trusses. A minimum of two supports under the "feet" of the geyser. If it looks shaky get a plumber to check it out. Nothing like a full (hot) geyser on the kitchen table to get everyone talking :-). Please note that all 200 liter Kwikot geysers are not to be wall mounted. The feet are not designed to support the weight! You can wall mount the 150 liter units. Follow their instructions - use 4x rawbolts!
- Electrical isolator switch within about 1m of the geyser. This was not a requirement on old geysers, but it is now and its worth fitting one. The geyser has to be earthed! I have seen many geysers with the earth wire unconnected. All the copper pipes must also be earthed and bonded to the geyser earth. This is not a trivial precaution! Get a qualified electrician to check your installation if the bonding is missing or looks dodge!! Electocution in the shower is always unpleasant!
- There should be a cover over the thermostat and element. Again - these are often just left lying next to the geyser. There are essentially only two primary thermostat types - the modern round "Kwiktherm" in newer Kwikot geysers and the VK (rectangular block) type in older geysers and in some newer non-Kwikot units.
- The geyser may be fed (cold water) with polcop (plastic) pipe - up to the shut off valve, but the pipe into and out of the geyser must be copper or gavanised steel. The PCV and T&P vent pipes also have to be steel or copper, especially the T&P vent. The hot water side should be copper, steel or suitably rated (70 degrees) plastic or composite pipe. Note that you must have at least 1m of copper/steel pipe out the geyser - you may not connect plastic (composite) pipe directly to the geyser.
- The two vent pipes for the PCV and T&P. As I mentioned previously these must be made of copper or steel - particularly the vent out of the T&P valve. Why you ask? Well, in the event of the T&P (safety) valve releasing, the water coming out is likely to be very, very hot! If the pipe is made of polycop then it will simply melt and then vent this water randomly into your ceiling space! This is not likely to happen on the PCV valve but the regulations say that it should also be made of metal. I have seen a number of installations where the installer has simply run a short length of 22mm copper into the drip tray. The idea being that the T&P can vent directly into the drip tray. A VERY BAD idea because the hot (100 degrees +) water/steam melts the drip tray and the PVC drain pipe. I have seen this on a number of occasions
- Note that water enters (cold) and leaves (hot) from above the geyser top - look at the diagram below. The PCV is typically above the geyser and the cold water flows down into the geyser. This is quite important because it forms an anti-syphon loop that prevents the geyser from draining back through the inlet in the event of a water supply failure. If you get hot water coming out your cold taps when the water supply fails then this is not working correctly. Get a plumber to come and have a look at it.
- The pipes into and out of the geyser should be lagged. This is important if you have "think pink" or "isotherm" ceiling insulation. This for two reasons - you lose heat through the unclad hot water pipes and all the pipes are more prone to freezing (and bursting).
- There must obviously be no signs of water! Any water lying in the trip tray is a sign of trouble.
Please note - I have described a typical, modern high pressure (400-600kpa) system - by far the most common type in South Africa. Vertical geysers are different although much of the description still applies. Low pressure systems (100kpa) are significantly different but fairly uncommon now.
Upgrading from low pressure to high pressure.
In the event of your old low pressure geyser giving up the spook, you don't really have an option nowadays. You could buy a new HP geyser and configure it as a low pressure system but that does not make a lot of sense. There are benefits to using a high pressure (HP) system - the most noticeable is that your hot water flow is better. This means that you can shower and the bath does not take hours to fill. The only concern is that the hot water pipes may not cope with the additional pressure. In our experience this seldom if ever happens. If the pipe is good for 1 Bar then it is probably going to be OK at 4 Bar. There may be exceptions to this and the hot water side can be "proofed", by testing if this is a concern.
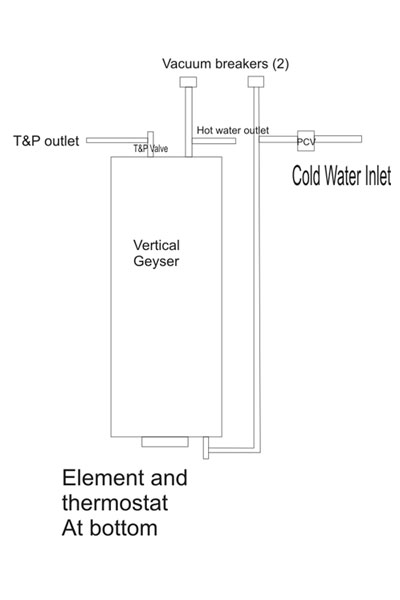
Vertical Installation
The same general rules apply but the outlet and T&P valves must be at the very top of the geyser. If the geyser does not have two outlets at the top then a banjo joint should be used to combine the two. The element and thermostat must always be at the very bottom. Allow enough room underneath to allow the changing of the thermostat and element. I suspect that there is a greater temperature differential in a vertical geyser - in other words the thermotat is a couple of degrees cooler than the outlet water. I tend to turn the thermostat down a tad more for this reason.
Geysers We Install